Illustrator

G Street - Part 1

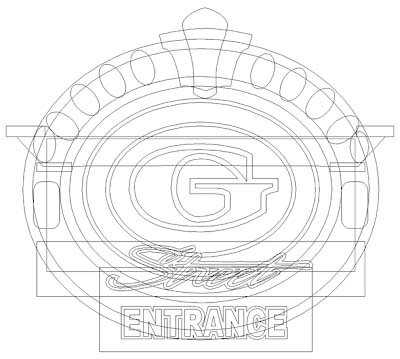
Jack Niemann's Black Forest Steakhouse needed a second sign for the handicap accessible entrance. Obviously, Jack wanted the sign for the “G Street” entrance be be done in the same style as the first sign. My father’s first step was to create the sign’s vectors in Illustrator - a vector program he is very comfortable with.

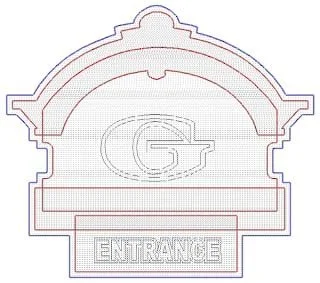
Then he imported the vector file into PhotoShop and quickly created this illustration with his digital pen and drawing pad to show Jack what he had in mind — he gave his instant approval.

With Jack’s approval in hand dad imported the vectors into EnRoute and began the task of building the routing file.

He could have used the “sweep two rails” tool to build the crown moulding, but opted to build each element separately and then merge them together at the end for maximum flexibility. Since the vectors were separated into groups, he used the “jigsaw” tool to cut out the shapes and then merged them together.

Then dad used the “bevel relief” tool to create a relief twice as wide as he needed before he merged (merge highest) a zero height relief (of the correct shape) to it to create the final shape he needed.

The top and bottom flat portions of the crown were done in a similar fashion using the “jigsaw” tool.

Then he made the egg shaped reliefs and merged highest to the crown molding.

Once the balance of the reliefs were created, dad merged them together to form the sign. He duplicated and flipped one of the reliefs to make sure the two halves matched perfectly. before adding the G to each side as a beveled letter.

He divided the sign into six pieces to be routed from 2" thick 30 lbs. Precision Board HDU.

Here it is on the CNC table, being routed.

See you next week for Part 2 of the G Street sign series!

Dirigible Model - Part 7

The final piece for our dirigible is a four foot long banner for the balloon to tow. It will have our name on it — this is advertising after all.

For maximum effect, its ‘wave’ will move both vertically and horizontally. We created the basic vectors and lettering in Illustrator and then imported these to EnRoute.

The next step is to size everything (as one unit). Then we added a border around the letters using the outline tool.

we created a flat relief and then imported a bitmap called ‘Splotches’ from our Texture Magic: Classic Collection. We selected the banner and the bitmap to light up the button shaped like a mountain and sky. A value of 0.15 created a subtle texture over the entire surface.

Then we selected the banner and the lettering outline to raise this area slightly from the background. If we had wanted this area to not have texture we could have built a separate relief and merged them later.

Last up was the slightly domed lettering which was raised 0.15 off the outline to make it easy to paint later.

We sent the finished file to the CNC router and then it was time to do a little bending.

We have a heating blanket for just such an occasion. We put it under the banner and let the heat soak in good. A full bucket of paint and block of HDU provided the weight we needed to bending the banner.

When we were satisfied with the curve, we turned off the heater and let everything cool down. The result was a banner that looks like it is flapping in the wind.

As usual, we mocked it up behind the balloon to make sure everything looked right before moving on to paint.

Once the last of the painting was complete we hung the finished dirigible in its permanent home in our studio.

And just like that, our first fourth axis routing project was officially done!

Queens' Signs

As a rule, we don’t build 3D files for other shops. And we are rarely called upon to build other people’s designs. However, these particular pub signs were and exception to both rules.

The designs were complex, but since we were promised complete vectors it seemed like a fairly straightforward job.

Unfortunately, when Dan first opened the vectors he discovered the centre of his screen was literally black with lines. It took him a couple of tries to find the source of the problem. As it turned out, EnRoute was importing the gradients as an endless series of closely spaced vector lines — the file was far too complex! The solution was to open the files in Illustrator and delete all of the fills and blends.Once they had been cleaned up, the files imported flawlessly.

However, many of the vectors in the file were still usable. The letters were too thin, some outlines were missing, and many components were broken up into small pieces.

It took a lot of careful planning to determine how he would shape and layer each piece to build the final 3D sign.

In the end, while the illustrations looked fabulous, on closer inspection they simply wouldn't work (as drawn) in the 3D world. So they needed to be cleaned up before he started creating reliefs.

The lesson? It is better to start a design with half an eye on how the sign will be built!

These three signs were to be double sided (each side routed from 2” thick HDU) so Dan started with a half inch thick relief.

Next, Dan added a 0.2" double border. This was done by adding to the relief.

From here on in things got a little more complex. Each layer was created as a separate relief, floated into final position as necessary and then merged to the base relief. The outline of the interior ‘fancy’ border was created next as a raised panel, above the border lines.

Next, Dan formed the scrollwork. Each layer of the scroll’s folds was created as a separate relief at the appropriate height, then combined together, and lastly merged with the base relief.

The top scroll and the filigree was next, done layer by layer and then merged with the bottom layer.

For the crown at the top of the sign, Dan decided he wanted a little more dimension. He formed a flat relief and then modified it with an oval. This rounded the crown out dramatically. Then he moved to the side view to bring it up above the top banner. To keep things simple, as he built the file, Dan deleted the vectors and redundant reliefs after they had each been merged.

The ‘Queens’ outline and prismatic lettering itself was next on the agenda.

After that, the home town lettering and border was floated up above everything else before being merged with the base relief.

The bar oval was as much work as the rest of the sign all by itself. To be usable as a routing file, the woven ribbon vectors had to be recreated from scratch — a lot of work but well worth the effort. The other elements were built as separate reliefs and combined to form the bar button.

Dan floated this to the same overall height as the tallest lettering and merged it to the base relief. And, just like that the file was ready for tool pathing!

Happily, since he had blazed the difficult trail on the first sign, Dan found it easier to follow on with the next two signs!