
The Glass Hive Studio is a husband and wife duo — he is a bee keeper and she is a glass artist. They came to us with a logo but it needed a reworking to make it suitable for a head turning sign. Happily, they loved our first concept design.

Once we received approval and a deposit we are ready to begin the sign. We create the bulk of the vector file for the sign’s face in Illustrator with the exception of the outlines and borders which are done in EnRoute.

The various reliefs are each generated separately and then merged together. The lettering is also built as a separate layer to be routed separately. These two pieces will be painted and then glued together. A second pair will be routed for the back side of the sign.
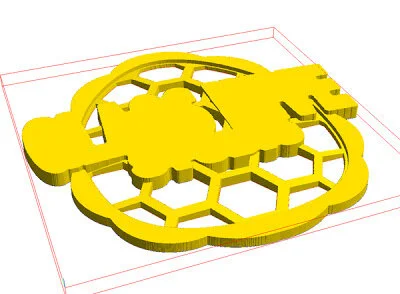
The lettering is built in a bevelled style on a slight arc.

As is our custom, we routed the sign from 30 lbs. Precision Board high density urethane (HDU). By design, the entire sign fits within a full 4' x 8' sheet of material.

While the CNC router works away we set about fabricating the lower steel structure for the sign. Once the sign is routed we will bend a piece of 1.5" x 1.5" square tubing and weld it onto the top, wrapping it around the sign.

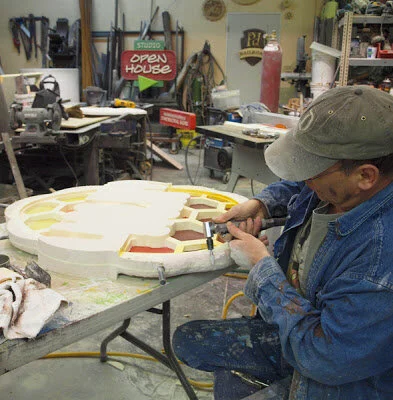
Next, we cover the pencil rod frame with expanded metal lath cover everything with a rough coat of sculpting.

After the thin rough coat of sculpting epoxy has cured (creating a solid base to work on) we start the second finished layer. To simulate tree bark we press on a layer of sculpt and, using crumpled heavy duty tinfoil, we stamp in the bark’s texture. Lastly, we use a sharpened stick to draw lines, delineating sections of bark. (we make sure to wet our tools with a little water to prevent them from sticking.)

Next we will glue the front and back sides of the routed sign together yesterday with vinyl covered Lexan sandwiched between the two layers. We will also laminate steel rods inside the frame (we will weld these to the structure later). Finally, we use an air powered die grinder to sculpt the edges of the sign.
Now it its time to bend a piece of steel tubing to shape and welded everything together. Once the rest of the sculpting epoxy is finished we will be ready for paint. As you can see in the pictures, we pre-painted the areas of the sign that were contact with the Lexan.

Once finished this double sided sign stands a hair over eight feet tall. We are pleased with the result, in particular, I like how the cool colours of the letters plays against the warmer background.
