
The trick to making the most of EnRoute is to combine a handful simple operations to build a more complex file. It takes the ability to visualize the final result to pull it off, (and some practice) but the results are well worth it.
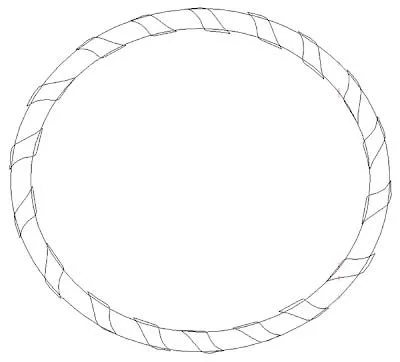
This week we will build an oval with a ribbon wrapped around its edge. The first step is to build the vectors for the ribbon, along with the borders.

The top and bottom loops of the ribbon vectors then need to be separated with two of the oval vectors.

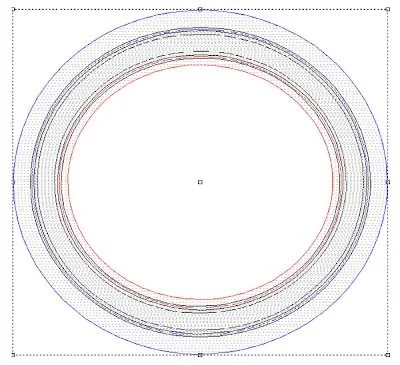
Then you can use the ovals to create an upward/downward donut shaped relief. Extrude the upper shapes of the top loops of the ribbon to 0.75" tall. Extrude the lower ribbon with the vector shapes at 0.15" tall.


Then you can create a narrow donut for the ribbon to wrap around.

Once these pieces are built and aligned you can merge everything together.

After this you can built the two ring reliefs that will frame the ribbon.
Also create a wider domed oval relief to be the base for the ribbon weave and other elements.
And lastly, create a dome relief for the centre.
Since all these elements are separate, you can float them vertically until you are happy.
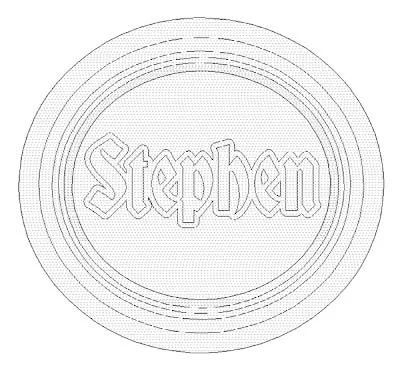
Once you are happy with the look of all the elements together you can add the texture and the letting.

Imported a bitmap texture (We used one from our Texture Magic: Classic Collection) and resized over the oval. Then apply the texture (we assigned it a height of 0.15").

Next you can built a flat relief of the lettering outlines. (You can modified it using an oval vector to match the profile of the textured oval background.)

Used the bevel tool to create the lettering.
You last step will be to create a zero height relief to merge everything to.
Then your plaque is ready for tool pathing and routing.

As you can see, some pretty cool effects can be achieved by building things step by step. The secret is to start simple and build on your knowledge and experience.
See you next week!