Dirigible Model - Part 5

As promised, today we will discuss the dirigible’s nose cones.

We opted to avoid using our router’s 4th axis for the ballon’s nose cones. Ever tool has its place and sticking with the 3rd axis promised to be quicker.

First, we measured up the balloon to determine the angle and size of the nose cone. Then, we began building the file in EnRoute. We used the revolve tool to build a mesh and then converted this to a relief. The red lines below show how we lined things up to a box of known dimensions.

The screen shot below show the settings we used to create the mesh.

As you can see, a mesh lights up red (not yellow like a relief) when it is selected and the ‘view button’ is turned on.

We then drew a vector box around the mesh and used this to create a zero height relief.

Selecting both the mesh and the relief allows us to use the merge mesh to relief button. The round option allows the relief to be smoothed as desired. We left the smoothing amount somewhere in the middle and selected ‘merge highest.’

Then we hit apply and, as the screen capture below shows, the red of the mesh peeks through a bit. Thus, we know the procedure worked as intended and we can delete the mesh.

The next task was creating the ‘slices’ we need in order to fit our nose cone pieces into a piece of 1.5" thick Precision Board HDU. The screen shot below shows the perimeters we entered to create two slices. Doing so creates the slices we need without touching the original file.

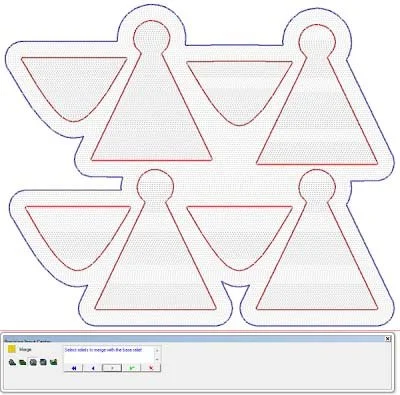
After this, we pulled out the two slices we needed and then moved them to the bottom of the plate.

Then we duplicated them to make four copies. We flipped over the top section so they fit together nicely.

To finish, we created an offset vector line of 0.7" around all the pieces and then made a zero height relief. Then we merged the pieces of the nose cone to the new relief before deleting the original cone pieces.

This created the finished routing file we would need.

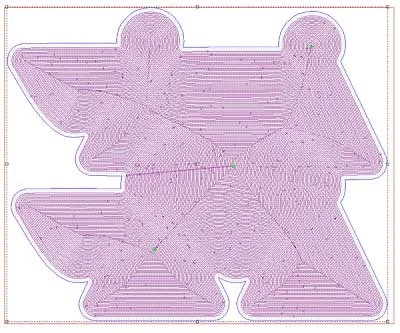
We tool pathed the file with a single pass using a 3/8" ball nose bit and an 80% overlap.

With the relatively large tool it didn't take long for the CNC router to cut these parts.

Next up we'll glue them together and onto the balloon. After that is is time for a little sculpting to make it look like everything was hand made.

Dirigible Model - Part 4

This hot air balloon was one of the first projects we cut on our four axis CNC router.

We cut it from a block of 30 lbs. Precision Board high density urethane (HDU) measuring 14" x 14" x 20" long. We had previously drilled a hole in the center of each end and driven a steel pipe into it for chucking the block up.

The routing operation had three phases.

The first step was to true the lathe. (We assign a steady feed rate for the y axis and the z feed is done in three passes as a straight line across the piece.)

The second step was to rough out the balloons shape — done in four passes. This was done with a half inch ball nose bit with a 50% overlap.

The final step was the cleanup pass — done with a 3/8" ball nose bit and a 95% overlap.

A higher than typical overlap was necessary because the piece had a large diameter. (The farther from the centreline the bit is, the more overlap it requires.)

As soon as the piece was done, we removed the steel pipes, drilled a hole, and mounted it to the driver's cab.

Our next instalment will show how we designed and routed the nose and tail cones for the balloon.

Dirigible Model - Part 3

Four axis routing is very similar three axis machining. Instead of moving the router head across the table (X axis) the rotary axis rotates the work in minute degrees while the spindle travels up and down the piece in the horizontal and vertical planes. Y & Z axis).

The real trick is understanding how rotating the piece will change how we design it.

For the most part we build the designs as we always have. However, we need to ensure that both sides of the design must match. (Because they must line up when the design is “wrapped” around a center line.

The second thing to remember is that the further we get from the center axis (ie. the more “3D” the piece is) the more things will stretch out when they are wrapped. The key here is to do a little math to figure out the finished circumferences.

There are formulas to calculate the amount of stretching that will occur at each distance from the centre but frankly, we tend to do this by eye based on our hands-on experience. All this is definitely a little trickier than flat work!

We want the middle section of the ballon to be much fatter than the ends — like a football. And, we also want it to look a bit like an overstuffed quilt — like it is covered in little pillows.

We will route the cones separately. Since the ends taper to almost point a lot of material and machine time would be used up for little effect by having them attached.

Our block of Precision Board is 14 inches square on the ends and 20 inches long. The balloon will taper to a 6" diameter on the ends. So, the circumference is 6" X 3.1416 = 18.8496". Thus, the plate for the balloon measures 18.8496 inches wide by 19 inches high.

We started the balloon’s design with diamond shaped vectors (for the “pillows”) and a rectangular vector (for the balloon).

When we built the diamond shaped grid, we made sure the corners of the diamond shapes went through the corners of the rectangle (so that everything will line up when it is wrapped).

We pulled these lines to the side and used the jigsaw tool to extract the diamonds as individual shapes, then deleted the lines. Then we used the offset tool to create even smaller diamonds inside those. These are the basis for the balloon’s puffy pillow shapes.

Then we deleted the lines — leaving the smaller diamonds intact.

After that, we drew an oval in the centre of the rectangle. This is where the balloon will hook up to the hot air pipe from the gondola. We used the jigsaw tool to trim the surrounding diamonds to fit.

Next, we created a relief using the rectangle and built the puffy diamonds using the dome tool. (Unfortunately, we neglected to get a screen shot of this stage but you can see the results a few pictures down.)

The next step was to build up the centre of the ballon to give it the shape of an inflated football. We wanted a 3" high arc so we built a 3" x 19" box. (We used this as a guide to create a curved vector line which would be used with the sweep two rails tool.) We also created two vertical vector lines that hug each side of the relief. (These would be our “rails.”)

So, we used sweep two rails to create a mesh. And, once we added the mesh to the relief it formed the arch we wanted.

However, when we lchecked our measurements at this point, we realized we had made a mistake. For some reason, we had made the file only twelve or so inches high instead of the required 18.8496." Happily, it was a simple matter to stretch it to the correct height.

The 3D view gives a better feel for what our balloon looks like at this point. The end towards the viewer will wrap around to meet the other side and form the balloon shape we want.

To run the file on our four axis CNC router, we tool pathed the file, in EnRoute, as we would any conventional 3D file. We used a half inch ballnose bit with a 50% overlap for the rough pass and a 3/8" ball nose bit with a 90% overlap for the fina passl. All speeds were set at 300 inches per minute.

Below you can see a wireframe simulation (side view) of the balloon as it will look when it is cut.