Name Tag 009: Phil

phil routed.jpg

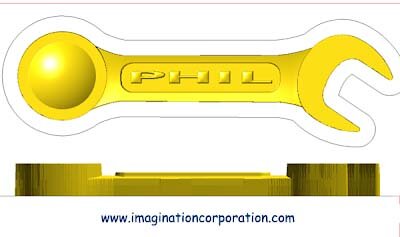
We used a wrench out of our tool box as reference when we created the vectors for Phil’s name plaque. They were done in three sections since each section needed to be different heights and shapes.

phil 1.jpg

We created the reliefs individually and merged them together before going to the next step.

The raised name plate was created as a separate relief and Phil's name was embossed using the subtract from relief tool - all in EnRoute.

phil 2.jpg

After this, we used the subtract from relief tool once more (in the dome mode) to create the beveled dimple in the box end of the relief.

phil 3.jpg

Then we created a zero height relief of the eight sided box end. This was merged with the wrench using merge lowest function.

phil 4.jpg

As simple as that, the wrench file was finished and ready to tool path.

phil 5.jpg

A piece like this makes a nice display piece and would make a great gift for anyone who likes to tinker in their workshop.

Name Tag 008: Shawn

shawn routed.jpg

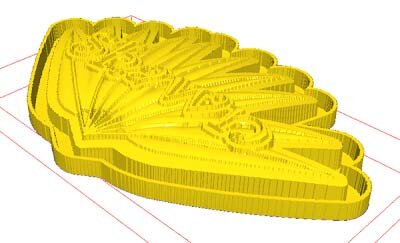
Shawn’s Name plaque has a tropical style. The fan shaped palm fronds were built by building one leaf and then copying and rotated the copies appropriately.

Each leaf was bisected with a line vertically and then using the jigsaw tool we created a separate vector for each half-leaf. The stems were created separately.

shawn 2.jpg

Once this was done, we lined everything up and created an outline to act as the base.

Now we are ready to create our reliefs.

shawn 1.jpg

We started with a flat relief background plate. first relief I made as a flat shape.

shawn 3.jpg

Then we drew an oval around the leaf and used it to give our flat relief a domed top.

We followed the same process for the lettering.

shawn 4.jpg

After this, we used the dome tool shape the two sides of the leaves. Then we used the oval again and modified the leaves so they mimicked the same shape as the previous elements.

Switching to front view, we nudged all our pieces to the right height. Once everything was in place we merged (highest) it all together.

shawn 5.jpg

The stems were created with the dome shape as well and modified in the same fashion as the other pieces. If you look close you can see we missed selecting the stem on the second leaf from the left. Unfortunately, we didn't catch it until the piece was routed... but we were able to add it using sculpting epoxy later.

shawn 6.jpg

With the last of the pieces made and positioned, the final step is to merged everything together. The we can tool path it and send it to the CNC router.

shawn 7.jpg

Name Tag 007: Roger

We create a name plaque for each each participant in our annual Workshops. They are a lasting memento and also serve as demonstrations of our various CNC, texturing, and painting techniques.

Roger's name tag has a classic look.

Roger's name tag has a classic look.

Roger’s plaque was designed in EnRoute.

To start, we type in the text using a simple cartoon script. However, as usual, the text needs to be modified a little.

To show why, here is a small sample with the text only.

The areas where the shapes merge tend to thicken or bulge a little. But this is easily fixed. We trace the letters with new vectors, separating the problem areas. Then we carefully cut the shapes and line them up so they overlap.

roger vectors.jpg
rodger vectors.jpg
letter reliefs.jpg

After this, using an outline around the letters, we create a flat relief .5" tall (the height is arbitrary). Then, using the same oval we will make the dome from, we modify the relief (using the same angle for the relief). This way they will match.

lettering domed.jpg

The dome background is next. Again, using the dome tool with the same vector and settings. Looking at the front view, we can see the letters sticking through.

domed lettering with middle.jpg

Next, we import one of our bitmaps (Wiggly Weave). We size and position it so the holes between the weave line up around the oval.

bitmap placement.jpg

Then we selected the relief and the bitmap and input a value of .2".

Remember, when using bitmaps: black does nothing and the white rises .2". Grays will be in between depending on their luminosity.

bitmap applied.jpg

After this, we select the lettering outline and, in the front view, we use the arrow keys to nudge it into position in relation to the weave background.

merged with background.jpg

We then create a half inch frame with a slightly rounded top using the dome relief tool.

After this, we create the profile of a rope using four circles which are then combined and sized.

rope vectors.jpg

The rope is created first as a mesh shape using the extrude tool. This tool takes some practice (we used seven rotations).

We use the arrow key (once again in the front view) to bring it into position. Then after selecting the rope and frame I merge them together; modifying the frame relief with the mesh object.

mesh object.jpg
progress 1.jpg

Lastly, we use our letter vectors to add the domed lettering.

finished file 3d.jpg

We used a 3/8 ballnose bit for a rough pass and a 1/8" tapered bit with an 80% overlap for the final pass.

The results speak for themselves.