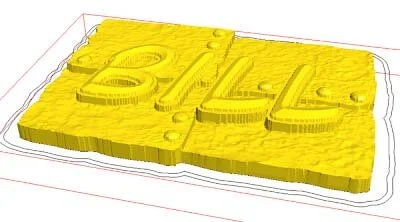
Name Tag 012: Bill

Bill's name plaque is a great example of how we like to use bitmaps to create complex shapes in EnRoute. While a similar effect could be accomplished using the ‘sweep two rails’ tool, we like the more organic look achieved with this method. Since the final results will look like beaten copper plates riveted together, it is even more appropriate to do it this way.

bill.jpg

We started as always with the vectors. We used a casual lettering and sized it ti fit the rivets between the double 'L's (which are always tricky to kern).

bill 1.jpg

Once we had created the four reliefs of the plates, we imported a bitmap (from our Texture Magic: Classic Collection) called uneven fade. It was sized and placed over each of the quadrants in turn. A value of .3" was inputed before executing. This effectively sloped each section so they appear to overlap.

bill 2.jpg

We nudged them up or down a click or two to make each joint even, checking in the 3D render window.

Then, we applied a second bitmap, from the collection, called ‘Splotches’ over all four sections to make the panels look like hammered and aged metal.

bill 4.jpg

We combined the four panels and then added to the relief using the dome tool to create the rivets.

bill 5.jpg

The lettering border was built as a separate relief, and then nudged into position vertically.

bill 6.jpg

Finally the bevelled lettering was added to complete the file.

bill 7.jpg

We always like to check it in the 3D render window one last time before we tool path it and send it to the CNC router.

bill 8.jpg

Once routed, the textured panel contrasts nicely with the smooth bevelled letters.

bill.jpg

Name Tag 011: Spencer

spencer routed.jpg

My father has always loved the car emblems from the fifties. At their best, they epitomize speed and grace. He designed Spencer's name plate to emulate that classic look. The tricky part of this design is cutting out part of the fancy swish under the name (to accommodate the “p”) without distorting the shape.

spencer 1.jpg

First up Dan created a beveled relief. He used the create relief bevel tool and limited the height to .2" over the base height parameter. This makes an instant bevel at any specified angle.

spencer 2a.jpg

Then Dan imported the wiggly line bitmap (from our Texture Magic: Classic Collection) and stretched it out enough that a 1/8" ballnose bit could easily cut between the lines. As always, black does nothing but white will rise up the specified amount. This bitmap was applied over a domed relief.

spencer 3.jpg

Then Dan created a bevelled relief with the triangle vector shape. This relief was modified using an oval vector to match the textured oval and nudged into position vertically.

spencer 4.jpg

He also created a zero height relief using an offset of the letter 'p'. This was merged with the triangle using the merge LOWEST function to notch the triangle shape perfectly around the lettering.

spencer 5.jpg
spencer 6.jpg

Lastly, Dan created the lettering using a dome shape and modified it using the same dome vector, then nudged it into position vertically in the front view.

spencer 7.jpg

Spencer’s plaque was routed in two passes, The first was with a 3/8" ball nose bit and a 50% overlap.

The final pass was with a tapered 1/8" ball nose bit using an 80% overlap.

spencer+routed.jpg

Name Tag 010: Jay

If you haven’t guessed by now; Dan loves texture. One of his favourite things to do is to mimic the look of an old piece of weathered driftwood.

jay routed.jpg

To start this piece, Dan typed the letters into EnRoute. But as per usual, the lettering needed a little tweaking to make it work. He kerned (adjusted the spacing between the letters) it a little. And, he also reduced the size of the 'A' just a little and bumped it up between the other letters.

jay 1.jpg

Then he decided he wanted the long cross bar of the 'A' to line up with the fancy jogs in the ‘J.’ He used the point editing tool to fix that up a little and then it was time to get down to business.

jay 2.jpg

I imported the driftwood bitmap (from our Texture Magic: Classic Collection. The starting point for this bitmap was a real piece of driftwood, but it has been heavily tweaked to make it work as a texture foundation. After importing the file, he used the vector drawing tool to trace a shape for the board outline.

jay 3.jpg

He also created a vector offset border around the letters and an oval vector which will be used to dome the letters to the shape of the sign.

jay 3a.jpg

Next, he used the dome relief tool with a shallow angle to create a shape. With all the jagged edges it's a little humpy and bumpy. But, for driftwood that will only add to the charm.

jay 4.jpg

He applied the bitmap at .3" This is a lit of texture depth but driftwood needs to be knarly. The end result looks pretty good but compared to a real piece of driftwood it is a bit even and flat. However, EnRoute has a tool to fix that in a hurry.

jay 5.jpg

The dome edit relief tool is used like a virtual carving tool. The parameters can be adjusted so the tool feathers as you adjust the pen pressure. With a few quickly applied strokes in the area of the arrows on the photo Dan carved away a layer of 'wood without diminishing the bitmap grain. The end results adds a lot of dramatic effect with little effort.

jay 6.jpg

Then he created a flat relief with the lettering border and modified it with the dome tool and the oval vector line to mimic the top curve of the driftwood relief. This was bumped to position vertically with the up/down keys in the front view of the screen. Once he was happy, Dan merged everything into one relief.

jay 7.jpg

Then Dan added the lettering, adding to the relief with the bevel shape. It was looking pretty spiffy but needed a little something extra.

jay 8.jpg

He decided to add some large spike heads, top and bottom. He created two irregular circles with the vector drawing tool. When he applied a bevel they instantly looked hand forged on account of the facets.

jay 9.jpg

He liked the effect, but decided they needed to be sloped slightly to match the tapered wood. Using the same oval he had used on the lettering, Dan modified the two reliefs using the dome tool.

jay 10.jpg

Jay's name plaque was now ready to tool-path and route!

jay 11.jpg

Fresh off the router it looks pretty good.